Eline, originally from The Netherlands, is currently doing an English Language and Linguistics Master and is a member of The Soulmen’s support team. In her new column, she will respond to some of the most frequently asked questions and share support answers that could be of interest to all Ulysses users out there.
Dividing Long Sheets Into Smaller Parts
I use Ulysses both on my MacBook and my iPad now, but there’s one thing I’m missing. As I like to just start writing without thinking, my sheets tend to get quite long. How do I cut them into pieces or even merge those pieces later on? – Cecile
Hi Cecile,
Great to hear that Ulysses has become your writing app of choice. Don’t worry about your sheets becoming long, Ulysses has a couple of handy features when it comes to managing their length. You can split a large sheet into smaller ones, it’s as easy as it sounds. On your Mac, just right-click where you’d like to split the sheet and select “Split Here…”. If you’re working on iPad or iPhone, tap and hold where you want to split and you’re set.
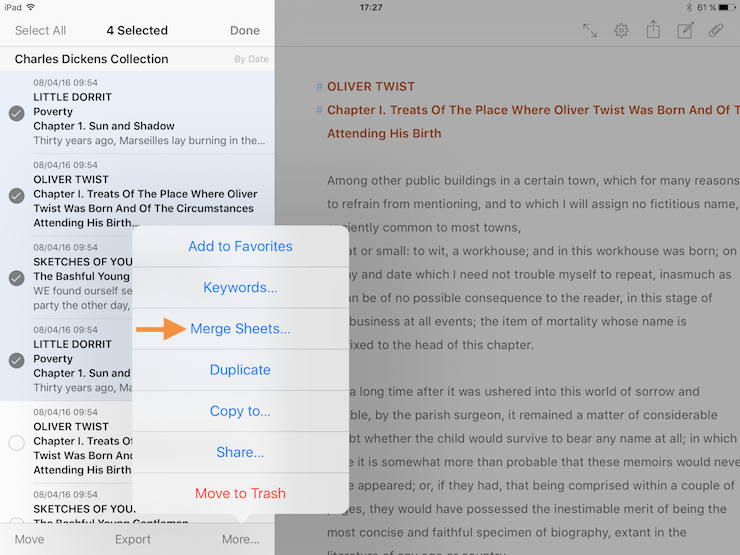
With Ulysses for Mac, you can merge sheets as follows: press and hold ⇧ (shift), select the sheets in question, right-click and select “Merge Sheets” from the context menu. On Ulysses for iPad or iPhone, go to the sheet list and tap “Select”, then check the appropriate sheets. You can merge your selection by tapping “More…” and then “Merge Sheets…” :

Ulysses on Your Mac, iPhone and iPad
Brent wants to know why Ulysses’ iOS license doesn’t extend to the Mac App Store and whether we can offer a discount for iOS users.
Ulysses for Mac, and Ulysses for iPhone and iPad are two different purchases, and unfortunately we’re not able to give a discount if you buy both. There are two separate stores, one for Mac apps and one for apps running on mobile devices, and Apple does not allow offering bundles or discounts across these stores. You can try out Ulysses for Mac before purchasing it, here’s the link to the demo version. Just go and see what’s in there for you, and don’t hesitate to ask any questions you might have. Ulysses’ iOS license is universal, you can run the app on every iPhone or iPad you personally own and use.
Adding White Lines to a Poem
Ever since I was a kid, I have been writing poetry. About a month ago, I’ve decided to switch to Ulysses. There’s just one thing that keeps nagging me. My style of writing sometimes requires me to add multiple white lines. I can do this just fine when writing the poems themselves but they disappear when I try to export them. Help! – Margaret
Hi Margaret,
Ulysses can handle your white lines just fine, but there’s a trick. When you press ⏎ (return), you switch paragraphs. New paragraphs normally start on the next line, regardless of the number of times you press ⏎. This default behavior is called a “paragraph break”.
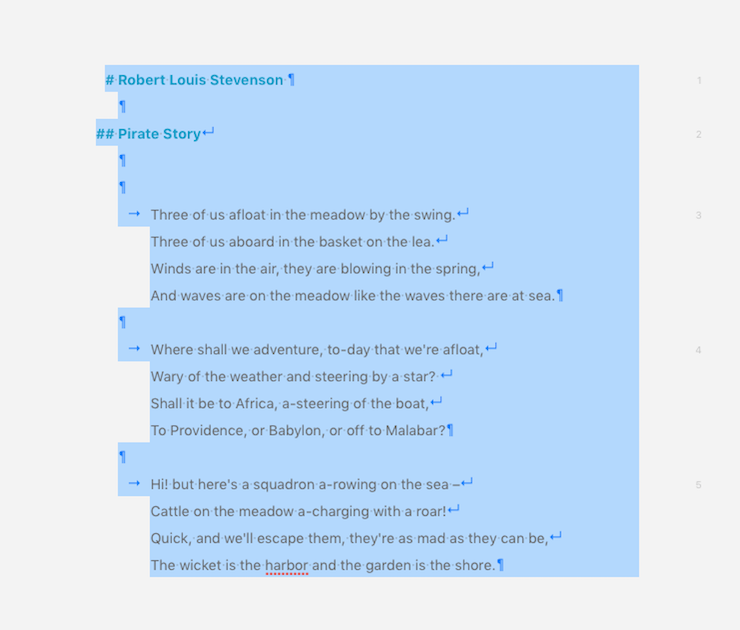
When you want to add more white lines, you’ll have to use “line breaks”. You can do this by pressing ⇧⏎ (shift-return) on Ulysses for Mac. On your iPad or iPhone, tap the A| button and select “Line Break” from the panel. These line breaks will be exported as such: add three of them and you’ll get three white lines.
On Ulysses for Mac, you can see which is which by selecting your text. The ¶ signs stand for paragraph breaks, ⏎ indicates a line break.

(Showing line and paragraph breaks is not yet possible on iPad or iPhone, but we’re planning to include this in a future version.)
Have fun writing in Ulysses!
Do you have a question about Ulysses yourself? Please don’t hesitate to get in touch via our Contact Form. Eline and her colleagues from the Ulysses support will do their best to help you out.
